Headgear

Covering the ears is one if my main goals when making any kind if head wear. I think it stems from being a kid; I always had to have my ears covered, even in the bath tub because of my frequent ear infections. I do it to my son too, “Cover those ears!”
I recently made a batch of requested head wear for a few folks and one of them is a headband. I know I’ve talked about headbands already, but this one is my own pattern so I thought I would share with you how to make your own. It is a great ear warmer!!

The materials that you will need are:

H hook

Worsted weight yarn, two colors if you want strips like mine

Scissors

Yarn or tapestry needle


Here’s the pattern:
Ch 10
Row 1: HDC In third ch from hook and HDC in each ch across, ch1 and turn (8HDC)
Row 2: HDC across, ch1 turn.

Continue until you reach the desired size to snuggly fit around your head. When the desired length is reached do not tie off! Simply ch1 and turn the work as if you are going to start another row, but instead hold the two ends together and slip stitch across. Then tie off the end and weave in ends. If you want stripes like mine, I switched color every third row. To ensure a smooth color change make sure you finish the last stitch of the row before you intend to switch by pulling up the new color when you have two loops on your hook.

Happy crocheting!

20140420-084011.jpg

Granny Squares

There are lots of books out there with wide arrays of crochet patterns and tips and tricks that, to be honest, can be found free of charge most the time. I find myself to be hard pressed to find a good crochet book that is really useful to me. One such book that I have managed to find is The Granny Square Book by Margaret Hubert. This book is full of nothing but beautifully delicious granny squares.
The granny square has been around for as long as our grannies have been, pun intended. In the 70’s they were plentiful in the form of shorts, vests, and all other forms of clothing. The beauty of the granny square is that, while you can make them as large as you like, you can also make them smaller, more traditional in size. Because of this traditionally small size, it makes the perfect scrap stash buster! All of those little balls of yarn floating around all lonely and feeling unneeded in the bottom of your stash or project bag can see the light of day again, or at least the light of the reading lamp by your bed.
Granny squares can be sewn together to make just about anything from pillows to blankets to bathing suits to wash cloths to purses and so on. The Granny Square Book provides its readers with so many granny squares to choose from in bright attractive colors that the possibilities are endless.

20140409-202109.jpg

Those pesky tails

I know that adding a new color to your work can leave tons of yarn tails to weave in, and I HATE weaving in the yarn ends when I finish a project. It is the worst part of crocheting and knitting. Fortunately I have figured out a way to eliminate some of that work. Here’s what I do.

color 1

So, this is the beginning of a new row. I have completed my slip stitch in the beginning of the previous row and I am going to chain two with my new color to beginning my next row.

color2

Here I have chained two with my new color. I keep the tail of the new color in the back of my work.

color3

Next I am going to complete my first stitch, which is double crochet. I yarn over twice to begin my double crochet stitch. I then insert my hook in the next stitch from the previous row and yarn over, when I yarn over I am going to do so AROUND the tail of my added strand of new color yarn, constantly keeping it in the back of my work and just working around it.

color4

I have completed my first stitch and I am making my second double crochet in this row. Again working around my tail from the new color yarn leaving it in the back of the work.

color5

This is what the back of your work will look like when you have worked down the row a little bit. When you have worked in as much of the yarn as you are comfortable with or all of the tail you can simply snip it off.

I hope this helps eliminate some of the finishing work to a project for you. Happy crocheting!!

Double Yarn Hat

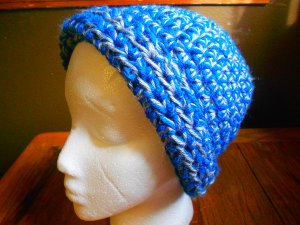
I frequently get requests to make various things for people and right now I am working on making hats for the people in my Dad’s office. Something I know is an issue with crochet, especially hats, is that it leaves holes. This is just produced normally by the technique of crochet and these holes unfortunately allow for air to pass through and doesn’t always keep the noggin completely warm. The remedy that I came up with for this is to make a hat holding two strands of worsted weight yarn together. Doing so seems to allow the yarn to disperse a little better and keeps the old noodle warmer. I am making a hat using this technique to make the hats for Dad’s co-workers. I’m sharing this pattern so that others can also keep their head warm. The yarn I used for my hat is Red Heart With Love in Peacock and Caron Simply Soft Grey Heather. I usually don’t use Red Heart yarn because it is just so rough and I don’t like to use any yarn I can’t cuddle with, but Red Heart has been producing some very nice value yarns as of late. The With Love line is very reasonably priced and is very soft and cozy. I will definitely be using more of their yarns in the future. I normally go for Hobby Lobby’s I Love This Yarn when I want to use acrylic but I actually think Red Heart’s With Love is softer. I would definitely recommend giving it a try. Also, Caron is always a good acrylic choice. It is a bit on the thinner side of worsted but it is also soft and cuddly and they have tons of colors to choose from.

Double Yarn Hat

Double Yarn Hat

Items needed:

Two skeins of worsted weight yarn (either the same color or two different colors) or one skein of bulky weight yarn

Size J crochet hook

Scissors

Yarn needle

Stitch Marker

Pattern:

Start with a magic circle.

Row 1: 5 hdc into the magic ring making sure to put the stitch marker into the first stitch of the row and move to first stitch of each row. Pull magic ring closed. Do not join. (5 sts)

Row 2: 2 hdc into each stitch around. (10 sts)

Row 3: hdc in next stitch, 2 hdc into next stitch. Repeat around. (15 sts)

Row 4: hdc in the next 2 stitches, 2 hdc into next stitch. Repeat around. (20 sts)

Row 5: hdc in the next 3 stitches, 2 hdc into next stitch. Repeat around (25 sts)

Row 6: hdc in the next 4 stitches, 2 hdc into next stitch. Repeat around (31 sts)

Row 7: hdc in the next 5 stitches, 2 hdc into next stitch. Repeat around (35 sts)

Row 8: hdc in the next 6 stitches, 2 hdc into next stitch. Repeat around (39)

Row 9: hdc in the next 12 stitches, 2 hdc into next stitch, hdc in the next 12 stiches, 2 hdc into next stitch, hdc in next 13 stitches, 2 hdc into last stitch. (43 sts)

Row 12-19: hdc in each stitch around.

Row 20: sc  in each stitch around.

Row 21: sl st in the next 3 stitches and finish off. Weave in ends.

Feel free to produce and sell this hat but if you post this pattern anywhere please reference back to me!

Smooth Transitions

When switching out colors in the middle if a row it can be difficult to get the two colors to transition smoothly. The piece I am currently working on is a graph pattern and it is a bit of a doozy. This project is the biggest I have ever made and it is taking me quite some time to complete; I have been working on it for about five months now and I am half way through it. Two or three rows takes me at least an hour. The way the graph is designed I have can’t turn my work at the end of a row; I have to work the next row with my left hand, and I am right handed. But, I like a challenge and it is a learning experience so it is ok. Unfortunately I can not share what the project actually is because it is a surprise gift for a family member, but rest assured that when I do finally finished it I will show it off because it is a gorgeous pattern.
Today I am going to show you how to smoothly transition from one color to another in the middle of a row. This can be done by getting to the point in the stitch when you are about to take that last step to complete the stitch (in this case it is two loops on your hook for a single crochet) and simply finish the stitch with the new color. So, to summarize with the single crochet example, you would have the loop on your hook from the previous stitch, insert your hook into the next stitch you need to work in, yarn over, and then pull up a loop leaving two loops on your hook. Next, yarn over with the new color you want to add and pull that loop through both loops already on your hook thus completing your single crochet. You now have a single loop on your hook in the new color and can continue on with your work until you need to switch colors again and complete the same process with the next color. Below are pictures of these steps. It is insanely easy and gives your finished piece a more polished look. Happy crocheting!